HTML Iframes
An iframe is used to display a web page within a web page.
Iframe Syntax
An HTML iframe is defined with the
<iframe> tag:
<iframe src="URL"></iframe>
The
src attribute specifies the URL (web address) of the inline frame page.Iframe - Set Height and Width
Use the
height and width attributes to specify the size of the iframe.
The height and width are specified in pixels by default:
Example
<iframe src="demo_iframe.htm" height="200" width="300"></iframe>
Or you can use CSS to set the height and width of the iframe:
Example
<iframe src="demo_iframe.htm" style="height:200px;width:300px;"></iframe>
Iframe - Remove the Border
By default, an iframe has a border around it.
To remove the border, add the
style attribute and use the CSS border property:Example
<iframe src="demo_iframe.htm" style="border:none;"></iframe>
With CSS, you can also change the size, style and color of the iframe's border:
Example
<iframe src="demo_iframe.htm" style="border:2px solid red;"></iframe>
Iframe - Target for a Link
An iframe can be used as the target frame for a link.
The
target attribute of the link must refer to the name attribute of the iframe:Example
<iframe src="demo_iframe.htm" name="iframe_a"></iframe>
<p><a href="https://www.w3schools.com" target="iframe_a">W3Schools.com</a></p>
HTML Exercises
HTML iframe Tag
| Tag | Description |
|---|---|
| <iframe> | Defines an inline frame |
For a complete list of all available HTML tags, visit our HTML Tag Reference.
HTML JavaScript
JavaScript makes HTML pages more dynamic and interactive.
Example
My First JavaScript
The HTML <script> Tag
The
<script> tag is used to define a client-side script (JavaScript).
The
<script> element either contains script statements, or it points to an external script file through the src attribute.
Common uses for JavaScript are image manipulation, form validation, and dynamic changes of content.
To select an HTML element, JavaScript most often uses the
document.getElementById() method.
This JavaScript example writes "Hello JavaScript!" into an HTML element with id="demo":
Example
<script>
document.getElementById("demo").innerHTML = "Hello JavaScript!";</script>
Tip: You can learn much more about JavaScript in our JavaScript Tutorial.
A Taste of JavaScript
Here are some examples of what JavaScript can do:
JavaScript can change HTML content
document.getElementById("demo").innerHTML = "Hello JavaScript!";
JavaScript can change HTML styles
document.getElementById("demo").style.fontSize = "25px";
document.getElementById("demo").style.color = "red";
document.getElementById("demo").style.backgroundColor = "yellow";
JavaScript can change HTML attributes
document.getElementById("image").src = "picture.gif";
The HTML <noscript> Tag
The
<noscript> tag is used to provide an alternate content for users that have disabled scripts in their browser or have a browser that doesn't support client-side scripts:Example
<script>
document.getElementById("demo").innerHTML = "Hello JavaScript!";</script>
<noscript>Sorry, your browser does not support JavaScript!</noscript>
HTML Script Tags
| Tag | Description |
|---|---|
| <script> | Defines a client-side script |
| <noscript> | Defines an alternate content for users that do not support client-side scripts |
HTML Exercises
HTML File Paths
| Path | Description |
|---|---|
| <img src="picture.jpg"> | picture.jpg is located in the same folder as the current page |
| <img src="images/picture.jpg"> | picture.jpg is located in the images folder in the current folder |
| <img src="/images/picture.jpg"> | picture.jpg is located in the images folder at the root of the current web |
| <img src="../picture.jpg"> | picture.jpg is located in the folder one level up from the current folder |
HTML File Paths
A file path describes the location of a file in a web site's folder structure.
File paths are used when linking to external files like:
- Web pages
- Images
- Style sheets
- JavaScripts
Absolute File Paths
An absolute file path is the full URL to an internet file:
Example
<img src="https://www.w3schools.com/images/picture.jpg" alt="Mountain">
The <img> tag is explained in the chapter about HTML Images.
Relative File Paths
A relative file path points to a file relative to the current page.
In this example, the file path points to a file in the images folder located at the root of the current web:
Example
<img src="/images/picture.jpg" alt="Mountain">
In this example, the file path points to a file in the images folder located in the current folder:
Example
<img src="images/picture.jpg" alt="Mountain">
In this example, the file path points to a file in the images folder located in the folder one level above the current folder:
Example
<img src="../images/picture.jpg" alt="Mountain">
Best Practice
It is best practice to use relative file paths (if possible).
When using relative file paths, your web pages will not be bound to your current base URL. All links will work on your own computer (localhost) as well as on your current public domain and your future public domains.
HTML Layouts
HTML Layout Example
Cities
London
London is the capital city of England. It is the most populous city in the United Kingdom, with a metropolitan area of over 13 million inhabitants.
Standing on the River Thames, London has been a major settlement for two millennia, its history going back to its founding by the Romans, who named it Londinium.
HTML Layout Elements
Websites often display content in multiple columns (like a magazine or newspaper).
HTML offers several semantic elements that define the different parts of a web page:
HTML Layout Techniques
There are five different ways to create multicolumn layouts. Each way has its pros and cons:
- HTML tables (not recommended)
- CSS float property
- CSS flexbox
- CSS framework
- CSS grid
Which One to Choose?
HTML Tables
The <table> element was not designed to be a layout tool! The purpose of the <table> element is to display tabular data. So, do not use tables for your page layout! They will bring a mess into your code. And imagine how hard it will be to redesign your site after a couple of months.
Tip: Do NOT use tables for your page layout!
CSS Frameworks
CSS Floats
It is common to do entire web layouts using the CSS float property. Float is easy to learn - you just need to remember how the float and clear properties work. Disadvantages: Floating elements are tied to the document flow, which may harm the flexibility. Learn more about float in our CSS Float and Clear chapter.
Float Example
Cities
London
London is the capital city of England. It is the most populous city in the United Kingdom, with a metropolitan area of over 13 million inhabitants.
Standing on the River Thames, London has been a major settlement for two millennia, its history going back to its founding by the Romans, who named it Londinium.
CSS Flexbox
Flexbox is a new layout mode in CSS3.
Use of flexbox ensures that elements behave predictably when the page layout must accommodate different screen sizes and different display devices. Disadvantages: Does not work in IE10 and earlier.
Learn more about flexbox in our CSS Flexbox chapter.
Flexbox Example
Cities
London
London is the capital city of England. It is the most populous city in the United Kingdom, with a metropolitan area of over 13 million inhabitants.
Standing on the River Thames, London has been a major settlement for two millennia, its history going back to its founding by the Romans, who named it Londinium.
CSS Grid View
The CSS Grid Layout Module offers a grid-based layout system, with rows and columns, making it easier to design web pages without having to use floats and positioning.
Disadvantages: Does not work in IE nor in Edge 15 and earlier.
Learn more about CSS grids in our CSS Grid View chapter.
HTML Responsive Web Design
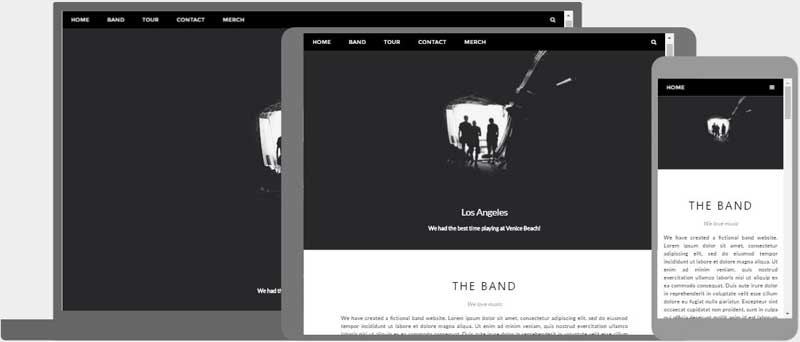
What is Responsive Web Design?
Responsive Web Design is about using HTML and CSS to automatically resize, hide, shrink, or enlarge, a website, to make it look good on all devices (desktops, tablets, and phones):
Note: A web page should look good on any device!
Setting The Viewport
When making responsive web pages, add the following
<meta> element in all your web pages:Example
<meta name="viewport" content="width=device-width, initial-scale=1.0">
This will set the viewport of your page, which will give the browser instructions on how to control the page's dimensions and scaling.
Here is an example of a web page without the viewport meta tag, and the same web page with the viewport meta tag:
Without the viewport meta tag:

With the viewport meta tag:
Tip: If you are browsing this page on a phone or a tablet, you can click on the two links above to see the difference.
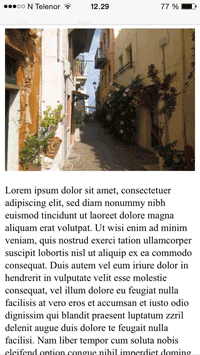
Responsive Images
Responsive images are images that scale nicely to fit any browser size.
Using the width Property
If the CSS
width property is set to 100%, the image will be responsive and scale up and down:
Example
<img src="img_girl.jpg" style="width:100%;">
Notice that in the example above, the image can be scaled up to be larger than its original size. A better solution, in many cases, will be to use the
max-width property instead.Using the max-width Property
If the
max-width property is set to 100%, the image will scale down if it has to, but never scale up to be larger than its original size:Example
<img src="img_girl.jpg" style="max-width:100%;height:auto;">
Show Different Images Depending on Browser Width
The HTML
<picture> element allows you to define different images for different browser window sizes.
Resize the browser window to see how the image below change depending on the width:

Example
<picture>
<source srcset="img_smallflower.jpg" media="(max-width: 600px)">
<source srcset="img_flowers.jpg" media="(max-width: 1500px)">
<source srcset="flowers.jpg">
<img src="img_smallflower.jpg" alt="Flowers">
</picture>
Responsive Text Size
The text size can be set with a "vw" unit, which means the "viewport width".
That way the text size will follow the size of the browser window:
Hello World
Resize the browser window to see how the text size scales.
Example
<h1 style="font-size:10vw">Hello World</h1>
Viewport is the browser window size. 1vw = 1% of viewport width. If the viewport is 50cm wide, 1vw is 0.5cm.
Media Queries
In addition to resize text and images, it is also common to use media queries in responsive web pages.
With media queries you can define completely different styles for different browser sizes.
Example: resize the browser window to see that the three div elements below will display horizontally on large screens and stacked vertically on small screens:
Main Content
Right Content
Example
<style>
.left, .right {
float: left;
width: 20%; /* The width is 20%, by default */}
.main {
float: left;
width: 60%; /* The width is 60%, by default */}
/* Use a media query to add a breakpoint at 800px: */
@media screen and (max-width: 800px) {
.left, .main, .right {
width: 100%; /* The width is 100%, when the viewport is 800px or smaller */
}}</style>
Tip: To learn more about Media Queries and Responsive Web Design, read our RWD Tutorial.
Responsive Web Page - Full Example
A responsive web page should look good on large desktop screens and on small mobile phones.
Responsive Web Design - Frameworks
There are many existing CSS Frameworks that offer Responsive Design.
They are free, and easy to use.
Using W3.CSS
A great way to create a responsive design, is to use a responsive style sheet, like W3.CSS
W3.CSS makes it easy to develop sites that look nice at any size; desktop, laptop, tablet, or phone:
W3.CSS Demo
Resize the page to see the responsiveness!
London
London is the capital city of England.
It is the most populous city in the United Kingdom, with a metropolitan area of over 13 million inhabitants.
Paris
Paris is the capital of France.
The Paris area is one of the largest population centers in Europe, with more than 12 million inhabitants.
Tokyo
Tokyo is the capital of Japan.
It is the center of the Greater Tokyo Area, and the most populous metropolitan area in the world.
Example
<!DOCTYPE html>
<html>
<meta name="viewport" content="width=device-width, initial-scale=1">
<link rel="stylesheet" href="https://www.w3schools.com/w3css/4/w3.css">
<body>
<div class="w3-container w3-green">
<h1>W3Schools Demo</h1>
<p>Resize this responsive page!</p>
</div>
<div class="w3-row-padding">
<div class="w3-third">
<h2>London</h2>
<p>London is the capital city of England.</p>
<p>It is the most populous city in the United Kingdom,
with a metropolitan area of over 13 million inhabitants.</p>
</div>
<div class="w3-third">
<h2>Paris</h2>
<p>Paris is the capital of France.</p>
<p>The Paris area is one of the largest population centers in Europe,
with more than 12 million inhabitants.</p>
</div>
<div class="w3-third">
<h2>Tokyo</h2>
<p>Tokyo is the capital of Japan.</p>
<p>It is the center of the Greater Tokyo Area,
and the most populous metropolitan area in the world.</p>
</div>
</div>
</body>
</html>
To learn more about W3.CSS, read our W3.CSS Tutorial.
Bootstrap
Another popular framework is Bootstrap, it uses HTML, CSS and jQuery to make responsive web pages.
Example
<!DOCTYPE html>
<html lang="en">
<head>
<title>Bootstrap Example</title>
<meta charset="utf-8">
<meta name="viewport" content="width=device-width, initial-scale=1">
<link rel="stylesheet" href="https://maxcdn.bootstrapcdn.com/bootstrap/3.3.7/css/bootstrap.min.css">
<script src="https://ajax.googleapis.com/ajax/libs/jquery/3.2.0/jquery.min.js"></script>
<script src="https://maxcdn.bootstrapcdn.com/bootstrap/3.3.7/js/bootstrap.min.js"></script>
</head>
<body>
<div class="container">
<div class="jumbotron">
<h1>My First Bootstrap Page</h1>
</div>
<div class="row">
<div class="col-sm-4">
...
</div>
<div class="col-sm-4">
...
</div>
<div class="col-sm-4">
...
</div>
</div>
</div>
</body>
</html>
To learn more about Bootstrap, go to our Bootstrap Tutorial.
HTML Computer Code Elements
Computer Code
<code>
x = 5;<br>
y = 6;<br>
z = x + y;
</code>
HTML <kbd> For Keyboard Input
The HTML
<kbd> element represents user input, like keyboard input or voice commands.
Text surrounded by
<kbd> tags is typically displayed in a monospace font:Example
<p>Save the document by pressing <kbd>Ctrl + S</kbd></p>
Result:
Save the document by pressing Ctrl + S
HTML <samp> For Program Output
The HTML
<samp> element represents output from a program or computing system.
Text surrounded by
<samp> tags is typically displayed in a monospace font:Example
<p>If you input wrong value, the program will return <samp>Error!</samp></p>
Result:
If you input wrong value, the program will return Error!
HTML <code> For Computer Code
The HTML
<code> element defines a fragment of computer code.
Text surrounded by
<code> tags is typically displayed in a monospace font: Example
<code>
x = 5;
y = 6;
z = x + y;
</code>
Result:
x = 5; y = 6; z = x + y;
Notice that the
<code> element does not preserve extra whitespace and line-breaks.
To fix this, you can put the
<code> element inside a <pre> element:Example
<pre>
<code>
x = 5;
y = 6;
z = x + y;
</code>
</pre>
Result:
x = 5;
y = 6;
z = x + y;
HTML <var> For Variables
The HTML
<var> element defines a variable.
The variable could be a variable in a mathematical expression or a variable in programming context:
Example
Einstein wrote: <var>E</var> = <var>mc</var><sup>2</sup>.
Result:
Einstein wrote: E = mc2.
HTML Exercises
HTML Computer Code Elements
| Tag | Description |
|---|---|
| <code> | Defines programming code |
| <kbd> | Defines keyboard input |
| <samp> | Defines computer output |
| <var> | Defines a variable |
| <pre> | Defines preformatted text |
For a complete list of all available HTML tags, visit our HTML Tag Reference.
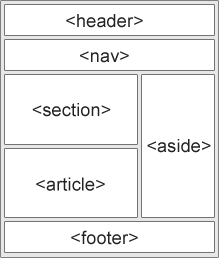
HTML Semantic Elements
Semantic elements = elements with a meaning.
What are Semantic Elements?
A semantic element clearly describes its meaning to both the browser and the developer.
Examples of non-semantic elements:
<div> and <span> - Tells nothing about its content.
Examples of semantic elements:
<form>, <table>, and <article> - Clearly defines its content.Semantic Elements in HTML
Many web sites contain HTML code like: <div id="nav"> <div class="header"> <div id="footer"> to indicate navigation, header, and footer.
In HTML there are some semantic elements that can be used to define different parts of a web page:
- <article>
- <aside>
- <details>
- <figcaption>
- <figure>
- <footer>
- <header>
- <main>
- <mark>
- <nav>
- <section>
- <summary>
- <time>
HTML <section> Element
The
<section> element defines a section in a document.
According to W3C's HTML documentation: "A section is a thematic grouping of content, typically with a heading."
A home page could normally be split into sections for introduction, content, and contact information.
Example
<section>
<h1>WWF</h1>
<p>The World Wide Fund for Nature (WWF) is....</p>
</section>
HTML <article> Element
The
<article> element specifies independent, self-contained content.
An article should make sense on its own, and it should be possible to read it independently from the rest of the web site.
Examples of where an
<article> element can be used:- Forum post
- Blog post
- Newspaper article
Example
<article>
<h1>What Does WWF Do?</h1>
<p>WWF's mission is to stop the degradation of our planet's natural environment,
and build a future in which humans live in harmony with nature.</p>
</article>
Nesting <article> in <section> or Vice Versa?
The
<article> element specifies independent, self-contained content.
The
<section> element defines section in a document.
Can we use the definitions to decide how to nest those elements? No, we cannot!
So, on the Internet, you will find HTML pages with
<section> elements containing <article> elements, and <article> elements containing <section> elements.
You will also find pages with
<section> elements containing <section> elements, and <article> elements containing <article> elements.
Example for a newspaper: The sport
<article> in the sport section, may have a technical section in each <article>.HTML <header> Element
The
<header> element specifies a header for a document or section.
The
<header> element should be used as a container for introductory content.
You can have several
<header> elements in one document.
The following example defines a header for an article:
Example
<article>
<header>
<h1>What Does WWF Do?</h1>
<p>WWF's mission:</p>
</header>
<p>WWF's mission is to stop the degradation of our planet's natural environment,
and build a future in which humans live in harmony with nature.</p>
</article>
HTML <footer> Element
The
<footer> element specifies a footer for a document or section.
A
<footer> element should contain information about its containing element.
A footer typically contains the author of the document, copyright information, links to terms of use, contact information, etc.
You may have several
<footer> elements in one document.Example
<footer>
<p>Posted by: Hege Refsnes</p>
<p>Contact information: <a href="mailto:someone@example.com">
someone@example.com</a>.</p>
</footer>
HTML <nav> Element
The
<nav> element defines a set of navigation links.
Notice that NOT all links of a document should be inside a
<nav> element. The <nav> element is intended only for major block of navigation links.Example
<nav>
<a href="/html/">HTML</a> |
<a href="/css/">CSS</a> |
<a href="/js/">JavaScript</a> |
<a href="/jquery/">jQuery</a>
</nav>
HTML <aside> Element
The
<aside> element defines some content aside from the content it is placed in (like a sidebar).
The
<aside> content should be related to the surrounding content.Example
<p>My family and I visited The Epcot center this summer.</p>
<aside>
<h4>Epcot Center</h4>
<p>The Epcot Center is a theme park in Disney World, Florida.</p>
</aside>
HTML <figure> and <figcaption> Elements
An image and a caption can be grouped together in a
<figure> element.
The purpose of a caption is to add a visual explanation to an image.
Example
<figure>
<img src="pic_trulli.jpg" alt="Trulli">
<figcaption>Fig1. - Trulli, Puglia, Italy.</figcaption>
</figure>
The
<img> element defines the image, the <figcaption> element defines the caption.Why Semantic Elements?
According to the W3C: "A semantic Web allows data to be shared and reused across applications, enterprises, and communities."
Semantic Elements in HTML
Below is an alphabetical list of some of the semantic elements in HTML.
The links go to our complete HTML Reference.
| Tag | Description |
|---|---|
| <article> | Defines an article |
| <aside> | Defines content aside from the page content |
| <details> | Defines additional details that the user can view or hide |
| <figcaption> | Defines a caption for a <figure> element |
| <figure> | Specifies self-contained content, like illustrations, diagrams, photos, code listings, etc. |
| <footer> | Defines a footer for a document or section |
| <header> | Specifies a header for a document or section |
| <main> | Specifies the main content of a document |
| <mark> | Defines marked/highlighted text |
| <nav> | Defines navigation links |
| <section> | Defines a section in a document |
| <summary> | Defines a visible heading for a <details> element |
| <time> | Defines a date/time |
HTML Forms
HTML Form Example
The <form> Element
The HTML
<form> element defines a form that is used to collect user input:
<form>
.
form elements
.
</form>
An HTML form contains form elements.
Form elements are different types of input elements, like: text fields, checkboxes, radio buttons, submit buttons, and more.
The <input> Element
The
<input> element is the most important form element.
The
<input> element is displayed in several ways, depending on the type attribute.
Here are some examples:
| Type | Description |
|---|---|
| <input type="text"> | Defines a single-line text input field |
| <input type="radio"> | Defines a radio button (for selecting one of many choices) |
| <input type="submit"> | Defines a submit button (for submitting the form) |
You will learn a lot more about input types later in this tutorial.
Text Fields
<input type="text"> defines a single-line input field for text input.Example
A form with two text input fields:
<form>
<label for="fname">First name:</label><br>
<input type="text" id="fname" name="fname"><br>
<label for="lname">Last name:</label><br>
<input type="text" id="lname" name="lname">
</form>
This is how it will look like in a browser:
Note: The form itself is not visible. Also note that the default width of an input field is 20 characters.
The <label> Element
Notice the use of the
<label> element in the example above.
The
<label> tag defines a label for many form elements.
The
<label> element is useful for screen-reader users, because the screen-reader will read out load the label when the user is focused on the input element.
The
<label> element also help users who have difficulty clicking on very small regions (such as radio buttons or checkboxes) - because when the user clicks the text within the <label> element, it toggles the radio button/checkbox.
The
for attribute of the <label> tag should be equal to the id attribute of the <input> element to bind them together.Radio Buttons
<input type="radio"> defines a radio button.
Radio buttons let a user select ONE of a limited number of choices.
Example
A form with radio buttons:
<form>
<input type="radio" id="male" name="gender" value="male">
<label for="male">Male</label><br>
<input type="radio" id="female" name="gender" value="female">
<label for="female">Female</label><br>
<input type="radio" id="other" name="gender" value="other">
<label for="other">Other</label>
</form>
This is how the HTML code above will be displayed in a browser:
The Submit Button
<input type="submit"> defines a button for submitting the form data to a form-handler.
The form-handler is typically a page on the server with a script for processing input data.
The form-handler is specified in the form's action attribute.
Example
A form with a submit button:
<form action="/action_page.php">
<label for="fname">First name:</label><br>
<input type="text" id="fname" name="fname" value="John"><br>
<label for="lname">Last name:</label><br>
<input type="text" id="lname" name="lname" value="Doe"><br><br>
<input type="submit" value="Submit">
</form>
This is how the HTML code above will be displayed in a browser:
The Action Attribute
The
action attribute defines the action to be performed when the form is submitted.
Usually, the form data is sent to a page on the server when the user clicks on the submit button.
In the example above, the form data is sent to a page on the server called "/action_page.php". This page contains a server-side script that handles the form data:
<form action="/action_page.php">
If the
action attribute is omitted, the action is set to the current page.The Target Attribute
The
target attribute specifies if the submitted result will open in a new browser tab, a frame, or in the current window.
The default value is "
_self" which means the form will be submitted in the current window.
To make the form result open in a new browser tab, use the value "
_blank".Example
Here, the submitted result will open in a new browser tab:
<form action="/action_page.php" target="_blank">
Other legal values are "
_parent", "_top", or a name representing the name of an iframe.The Method Attribute
The
method attribute specifies the HTTP method (GET or POST) to be used when submitting the form data.Example
Use the GET method when submitting the form:
<form action="/action_page.php" method="get">
or:
Example
Use the POST method when submitting the form:
<form action="/action_page.php" method="post">
When to Use GET?
The default HTTP method when submitting form data is GET.
However, when GET is used, the form data will be visible in the page's address field:
/action_page.php?firstname=John&lastname=Doe
Notes on GET:
- Appends form-data into the URL in name/value pairs
- The length of a URL is limited (2048 characters)
- Never use GET to send sensitive data! (will be visible in the URL)
- Useful for form submissions where a user wants to bookmark the result
- GET is better for non-secure data, like query strings in Google
When to Use POST?
Always use POST if the form data contains sensitive or personal information. The POST method does not display the form data in the page address field.
Notes on POST:
- POST has no size limitations, and can be used to send large amounts of data.
- Form submissions with POST cannot be bookmarked
The Name Attribute
Each input field must have a
name attribute to be submitted.
If the
name attribute is omitted, the data of that input field will not be sent at all.Example
This example will not submit the value of the "First name" input field:
<form action="/action_page.php">
<label for="fname">First name:</label><br>
<input type="text" id="fname" value="John"><br><br>
<input type="submit" value="Submit">
</form>
HTML Exercises
Here is the list of all
<form> attributes:| Attribute | Description |
|---|---|
| accept-charset | Specifies the charset used in the submitted form (default: the page charset). |
| action | Specifies an address (url) where to submit the form (default: the submitting page). |
| autocomplete | Specifies if the browser should autocomplete the form (default: on). |
| enctype | Specifies the encoding of the submitted data (default: is url-encoded). |
| method | Specifies the HTTP method used when submitting the form (default: GET). |
| name | Specifies a name used to identify the form (for DOM usage: document.forms.name). |
| novalidate | Specifies that the browser should not validate the form. |
| target | Specifies the target of the address in the action attribute (default: _self). |
You will learn more about the form attributes in the next chapters.
HTML Form Elements
This chapter describes all the different HTML form elements.
The <input> Element
One of the most used form element is the
<input> element.
The
<input> element can be displayed in several ways, depending on the type attribute.Example
<input type="text" id="firstname" name="firstname">
If the
type attribute is omitted, the input field gets the default type: "text".
All the different input types are covered in the next chapter: HTML Input Types.
The <select> Element
The
<select> element defines a drop-down list:Example
<select id="cars" name="cars">
<option value="volvo">Volvo</option>
<option value="saab">Saab</option>
<option value="fiat">Fiat</option>
<option value="audi">Audi</option>
</select>
The
<option> elements defines an option that can be selected.
By default, the first item in the drop-down list is selected.
To define a pre-selected option, add the
selected attribute to the option:Example
<option value="fiat" selected>Fiat</option>
Visible Values:
Use the
size attribute to specify the number of visible values:Example
<select name="cars" size="3">
<option value="volvo">Volvo</option>
<option value="saab">Saab</option>
<option value="fiat">Fiat</option>
<option value="audi">Audi</option>
</select>
Allow Multiple Selections:
Use the
multiple attribute to allow the user to select more than one value:Example
<select name="cars" size="4" multiple>
<option value="volvo">Volvo</option>
<option value="saab">Saab</option>
<option value="fiat">Fiat</option>
<option value="audi">Audi</option>
</select>
The <textarea> Element
The
<textarea> element defines a multi-line input field (a text area):Example
<textarea name="message" rows="10" cols="30">
The cat was playing in the garden.
</textarea>
The
rows attribute specifies the visible number of lines in a text area.
The
cols attribute specifies the visible width of a text area.
This is how the HTML code above will be displayed in a browser:
You can also define the size of the text area by using CSS:
Example
<textarea name="message" style="width:200px; height:600px;">
The cat was playing in the garden.
</textarea>
The <button> Element
The
<button> element defines a clickable button:Example
<button type="button" onclick="alert('Hello World!')">Click Me!</button>
This is how the HTML code above will be displayed in a browser:
Note: Always specify the type attribute for the button element. Different browsers may use different default types for the button element.
The <fieldset> and <legend> Elements
The
<fieldset> element is used to group related data in a form.
The
<legend> element defines a caption for the <fieldset> element.Example
<form action="/action_page.php">
<fieldset>
<legend>Personalia:</legend>
<label for="fname">First name:</label><br>
<input type="text" id="fname" name="fname" value="John"><br>
<label for="lname">Last name:</label><br>
<input type="text" id="lname" name="lname" value="Doe"><br><br>
<input type="submit" value="Submit">
</fieldset>
</form>
This is how the HTML code above will be displayed in a browser:
The <datalist> Element
The
<datalist> element specifies a list of pre-defined options for an <input> element.
Users will see a drop-down list of the pre-defined options as they input data.
The
list attribute of the <input> element, must refer to the id attribute of the <datalist> element.Example
<form action="/action_page.php">
<input list="browsers">
<datalist id="browsers">
<option value="Internet Explorer">
<option value="Firefox">
<option value="Chrome">
<option value="Opera">
<option value="Safari">
</datalist>
</form>
The <output> Element
The
<output> element represents the result of a calculation (like one performed by a script).Example
Perform a calculation and show the result in an
<output> element:
<form action="/action_page.php"
oninput="x.value=parseInt(a.value)+parseInt(b.value)">
0
<input type="range" id="a" name="a" value="50">
100 +
<input type="number" id="b" name="b" value="50">
=
<output name="x" for="a b"></output>
<br><br>
<input type="submit">
</form>
HTML Exercises
HTML Form Elements
| Tag | Description |
|---|---|
| <form> | Defines an HTML form for user input |
| <input> | Defines an input control |
| <textarea> | Defines a multiline input control (text area) |
| <label> | Defines a label for an <input> element |
| <fieldset> | Groups related elements in a form |
| <legend> | Defines a caption for a <fieldset> element |
| <select> | Defines a drop-down list |
| <optgroup> | Defines a group of related options in a drop-down list |
| <option> | Defines an option in a drop-down list |
| <button> | Defines a clickable button |
| <datalist> | Specifies a list of pre-defined options for input controls |
| <output> | Defines the result of a calculation |
For a complete list of all available HTML tags, visit our HTML Tag Reference.
HTML Input Types
This chapter describes the different input types for the <input> element.
HTML Input Types
Here are the different input types you can use in HTML:
<input type="button"><input type="checkbox"><input type="color"><input type="date"><input type="datetime-local"><input type="email"><input type="file"><input type="hidden"><input type="image"><input type="month"><input type="number"><input type="password"><input type="radio"><input type="range"><input type="reset"><input type="search"><input type="submit"><input type="tel"><input type="text"><input type="time"><input type="url"><input type="week">
Input Type Text
<input type="text"> defines a single-line text input field:Example
<form>
<label for="fname">First name:</label><br>
<input type="text" id="fname" name="fname"><br>
<label for="lname">Last name:</label><br>
<input type="text" id="lname" name="lname">
</form>
This is how the HTML code above will be displayed in a browser:
First name:Last name:
Input Type Password
<input type="password"> defines a password field:Example
<form>
<label for="username">Username:</label><br>
<input type="text" id="username" name="username"><br>
<label for="pwd">Password:</label><br>
<input type="password" id="pwd" name="pwd">
</form>
This is how the HTML code above will be displayed in a browser:
Username:Password:
The characters in a password field are masked (shown as asterisks or circles).
Input Type Submit
<input type="submit"> defines a button for submitting form data to a form-handler.
The form-handler is typically a server page with a script for processing input data.
The form-handler is specified in the form's
action attribute:Example
<form action="/action_page.php">
<label for="fname">First name:</label><br>
<input type="text" id="fname" name="fname" value="John"><br>
<label for="lname">Last name:</label><br>
<input type="text" id="lname" name="lname" value="Doe"><br><br>
<input type="submit" value="Submit">
</form>
This is how the HTML code above will be displayed in a browser:
If you omit the submit button's value attribute, the button will get a default text:
Example
<form action="/action_page.php">
<label for="fname">First name:</label><br>
<input type="text" id="fname" name="fname" value="John"><br>
<label for="lname">Last name:</label><br>
<input type="text" id="lname" name="lname" value="Doe"><br><br>
<input type="submit">
</form>
Input Type Reset
<input type="reset"> defines a reset button that will reset all form values to their default values:Example
<form action="/action_page.php">
<label for="fname">First name:</label><br>
<input type="text" id="fname" name="fname" value="John"><br>
<label for="lname">Last name:</label><br>
<input type="text" id="lname" name="lname" value="Doe"><br><br>
<input type="submit" value="Submit">
<input type="reset">
</form>
This is how the HTML code above will be displayed in a browser:
If you change the input values and then click the "Reset" button, the form-data will be reset to the default values.
Input Type Radio
<input type="radio"> defines a radio button.
Radio buttons let a user select ONLY ONE of a limited number of choices:
Example
<form>
<input type="radio" id="male" name="gender" value="male">
<label for="male">Male</label><br>
<input type="radio" id="female" name="gender" value="female">
<label for="female">Female</label><br>
<input type="radio" id="other" name="gender" value="other">
<label for="other">Other</label>
</form>
This is how the HTML code above will be displayed in a browser:
Input Type Checkbox
<input type="checkbox"> defines a checkbox.
Checkboxes let a user select ZERO or MORE options of a limited number of choices.
Example
<form>
<input type="checkbox" id="vehicle1" name="vehicle1" value="Bike">
<label for="vehicle1"> I have a bike</label><br>
<input type="checkbox" id="vehicle2" name="vehicle2" value="Car">
<label for="vehicle2"> I have a car</label><br>
<input type="checkbox" id="vehicle3" name="vehicle3" value="Boat">
<label for="vehicle3"> I have a boat</label>
</form>
This is how the HTML code above will be displayed in a browser:
Input Type Button
<input type="button"> defines a button:Example
<input type="button" onclick="alert('Hello World!')" value="Click Me!">
This is how the HTML code above will be displayed in a browser:
Input Type Color
The
<input type="color"> is used for input fields that should contain a color.
Depending on browser support, a color picker can show up in the input field.
Example
<form>
<label for="favcolor">Select your favorite color:</label>
<input type="color" id="favcolor" name="favcolor">
</form>
Input Type Date
The
<input type="date"> is used for input fields that should contain a date.
Depending on browser support, a date picker can show up in the input field.
Example
<form>
<label for="birthday">Birthday:</label>
<input type="date" id="birthday" name="birthday">
</form>
You can also use the
min and max attributes to add restrictions to dates:Example
<form>
<label for="datemax">Enter a date before 1980-01-01:</label>
<input type="date" id="datemax" name="datemax" max="1979-12-31"><br><br>
<label for="datemin">Enter a date after 2000-01-01:</label>
<input type="date" id="datemin" name="datemin" min="2000-01-02">
</form>
Input Type Datetime-local
The
<input type="datetime-local"> specifies a date and time input field, with no time zone.
Depending on browser support, a date picker can show up in the input field.
Example
<form>
<label for="birthdaytime">Birthday (date and time):</label>
<input type="datetime-local" id="birthdaytime" name="birthdaytime">
</form>
Input Type Email
The
<input type="email"> is used for input fields that should contain an e-mail address.
Depending on browser support, the e-mail address can be automatically validated when submitted.
Some smartphones recognize the email type, and add ".com" to the keyboard to match email input.
Example
<form>
<label for="email">Enter your email:</label>
<input type="email" id="email" name="email">
</form>
Input Type File
The
<input type="file"> defines a file-select field and a "Browse" button for file uploads.Example
<form>
<label for="myfile">Select a file:</label>
<input type="file" id="myfile" name="myfile">
</form>
Input Type Month
The
<input type="month"> allows the user to select a month and year.
Depending on browser support, a date picker can show up in the input field.
Example
<form>
<label for="bdaymonth">Birthday (month and year):</label>
<input type="month" id="bdaymonth" name="bdaymonth">
</form>
Input Type Number
The
<input type="number"> defines a numeric input field.
You can also set restrictions on what numbers are accepted.
The following example displays a numeric input field, where you can enter a value from 1 to 5:
Example
<form>
<label for="quantity">Quantity (between 1 and 5):</label>
<input type="number" id="quantity" name="quantity" min="1" max="5">
</form>
Input Restrictions
Here is a list of some common input restrictions:
| Attribute | Description |
|---|---|
| checked | Specifies that an input field should be pre-selected when the page loads (for type="checkbox" or type="radio") |
| disabled | Specifies that an input field should be disabled |
| max | Specifies the maximum value for an input field |
| maxlength | Specifies the maximum number of character for an input field |
| min | Specifies the minimum value for an input field |
| pattern | Specifies a regular expression to check the input value against |
| readonly | Specifies that an input field is read only (cannot be changed) |
| required | Specifies that an input field is required (must be filled out) |
| size | Specifies the width (in characters) of an input field |
| step | Specifies the legal number intervals for an input field |
| value | Specifies the default value for an input field |
You will learn more about input restrictions in the next chapter.
The following example displays a numeric input field, where you can enter a value from 0 to 100, in steps of 10. The default value is 30:
Example
<form>
<label for="quantity">Quantity:</label>
<input type="number" id="quantity" name="quantity" min="0" max="100" step="10" value="30">
</form>
Input Type Range
The
<input type="range"> defines a control for entering a number whose exact value is not important (like a slider control). Default range is 0 to 100. However, you can set restrictions on what numbers are accepted with the min, max, and step attributes:Example
<form>
<label for="vol">Volume (between 0 and 50):</label>
<input type="range" id="vol" name="vol" min="0" max="50">
</form>
Input Type Search
The
<input type="search"> is used for search fields (a search field behaves like a regular text field).Example
<form>
<label for="gsearch">Search Google:</label>
<input type="search" id="gsearch" name="gsearch">
</form>
Input Type Tel
The
<input type="tel"> is used for input fields that should contain a telephone number.Example
<form>
<label for="phone">Enter your phone number:</label>
<input type="tel" id="phone" name="phone" pattern="[0-9]{3}-[0-9]{2}-[0-9]{3}">
</form>
Input Type Time
The
<input type="time"> allows the user to select a time (no time zone).
Depending on browser support, a time picker can show up in the input field.
Example
<form>
<label for="appt">Select a time:</label>
<input type="time" id="appt" name="appt">
</form>
Input Type Url
The
<input type="url"> is used for input fields that should contain a URL address.
Depending on browser support, the url field can be automatically validated when submitted.
Some smartphones recognize the url type, and adds ".com" to the keyboard to match url input.
Example
<form>
<label for="homepage">Add your homepage:</label>
<input type="url" id="homepage" name="homepage">
</form>
Input Type Week
The
<input type="week"> allows the user to select a week and year.
Depending on browser support, a date picker can show up in the input field.
Example
<form>
<label for="week">Select a week:</label>
<input type="week" id="week" name="week">
</form>
HTML Exercises
HTML Input Type Attribute
| Tag | Description |
|---|---|
| <input type=""> | Specifies the input type to display |
HTML Input Attributes
The value Attribute
The input
value attribute specifies an initial value for an input field:Example
Input fields with initial (default) values:
<form>
<label for="fname">First name:</label><br>
<input type="text" id="fname" name="fname" value="John"><br>
<label for="lname">Last name:</label><br>
<input type="text" id="lname" name="lname" value="Doe">
</form>
The readonly Attribute
The input
readonly attribute specifies that an input field is read-only.
A read-only input field cannot be modified (however, a user can tab to it, highlight it, and copy the text from it).
The value of a read-only input field will be sent when submitting the form!
Example
A read-only input field:
<form>
<label for="fname">First name:</label><br>
<input type="text" id="fname" name="fname" value="John" readonly><br>
<label for="lname">Last name:</label><br>
<input type="text" id="lname" name="lname" value="Doe">
</form>
The disabled Attribute
The input
disabled attribute specifies that an input field should be disabled.
A disabled input field is unusable and un-clickable.
The value of a disabled input field will not be sent when submitting the form!
Example
A disabled input field:
<form>
<label for="fname">First name:</label><br>
<input type="text" id="fname" name="fname" value="John" disabled><br>
<label for="lname">Last name:</label><br>
<input type="text" id="lname" name="lname" value="Doe">
</form>
The size Attribute
The input
size attribute specifies the visible width, in characters, of an input field.
The default value for
size is 20.
Note: The
size attribute works with the following input types: text, search, tel, url, email, and password.Example
Set a width for an input field:
<form>
<label for="fname">First name:</label><br>
<input type="text" id="fname" name="fname" size="50"><br>
<label for="pin">PIN:</label><br>
<input type="text" id="pin" name="pin" size="4">
</form>
The maxlength Attribute
The input
maxlength attribute specifies the maximum number of characters allowed in an input field.
Note: When a
maxlength is set, the input field will not accept more than the specified number of characters. However, this attribute does not provide any feedback. So, if you want to alert the user, you must write JavaScript code.Example
Set a maximum length for an input field:
<form>
<label for="fname">First name:</label><br>
<input type="text" id="fname" name="fname" size="50"><br>
<label for="pin">PIN:</label><br>
<input type="text" id="pin" name="pin" maxlength="4" size="4">
</form>
The min and max Attributes
The input
min and max attributes specify the minimum and maximum values for an input field.
The
min and max attributes work with the following input types: number, range, date, datetime-local, month, time and week.
Tip: Use the max and min attributes together to create a range of legal values.
Example
Set a max date, a min date, and a range of legal values:
<form>
<label for="datemax">Enter a date before 1980-01-01:</label>
<input type="date" id="datemax" name="datemax" max="1979-12-31"><br><br>
<label for="datemin">Enter a date after 2000-01-01:</label>
<input type="date" id="datemin" name="datemin" min="2000-01-02"><br><br>
<label for="quantity">Quantity (between 1 and 5):</label>
<input type="number" id="quantity" name="quantity" min="1" max="5">
</form>>
The multiple Attribute
The input
multiple attribute specifies that the user is allowed to enter more than one value in an input field.
The
multiple attribute works with the following input types: email, and file.Example
A file upload field that accepts multiple values:
<form>
<label for="files">Select files:</label>
<input type="file" id="files" name="files" multiple>
</form>
The pattern Attribute
The input
pattern attribute specifies a regular expression that the input field's value is checked against, when the form is submitted.
The
pattern attribute works with the following input types: text, date, search, url, tel, email, and password.
Tip: Use the global title attribute to describe the pattern to help the user.
Tip: Learn more about regular expressions in our JavaScript tutorial.
Example
An input field that can contain only three letters (no numbers or special characters):
<form>
<label for="country_code">Country code:</label>
<input type="text" id="country_code" name="country_code"
pattern="[A-Za-z]{3}" title="Three letter country code">
</form>
The placeholder Attribute
The input
placeholder attribute specifies short a hint that describes the expected value of an input field (a sample value or a short description of the expected format).
The short hint is displayed in the input field before the user enters a value.
The
placeholder attribute works with the following input types: text, search, url, tel, email, and password.Example
An input field with a placeholder text:
<form>
<label for="phone">Enter a phone number:</label>
<input type="tel" id="phone" name="phone"
placeholder="123-45-678"
pattern="[0-9]{3}-[0-9]{2}-[0-9]{3}">
</form>
The required Attribute
The input
required attribute specifies that an input field must be filled out before submitting the form.
The
required attribute works with the following input types: text, search, url, tel, email, password, date pickers, number, checkbox, radio, and file.Example
A required input field:
<form>
<label for="username">Username:</label>
<input type="text" id="username" name="username" required>
</form>
The step Attribute
The input
step attribute specifies the legal number intervals for an input field.
Example: if step="3", legal numbers could be -3, 0, 3, 6, etc.
Tip: This attribute can be used together with the max and min attributes to create a range of legal values.
The
step attribute works with the following input types: number, range, date, datetime-local, month, time and week.Example
An input field with a specified legal number intervals:
<form>
<label for="points">Points:</label>
<input type="number" id="points" name="points" step="3">
</form>
Note: Input restrictions are not foolproof, and JavaScript provides many ways to add illegal input. To safely restrict input, it must also be checked by the receiver (the server)!
The autofocus Attribute
The input
autofocus attribute specifies that an input field should automatically get focus when the page loads.Example
Let the "First name" input field automatically get focus when the page loads:
<form>
<label for="fname">First name:</label><br>
<input type="text" id="fname" name="fname" autofocus><br>
<label for="lname">Last name:</label><br>
<input type="text" id="lname" name="lname">
</form>
The height and width Attributes
The input
height and width attributes specify the height and width of an <input type="image"> element.
Tip: Always specify both the height and width attributes for images. If height and width are set, the space required for the image is reserved when the page is loaded. Without these attributes, the browser does not know the size of the image, and cannot reserve the appropriate space to it. The effect will be that the page layout will change during loading (while the images load).
Example
Define an image as the submit button, with height and width attributes:
<form>
<label for="fname">First name:</label>
<input type="text" id="fname" name="fname"><br><br>
<label for="lname">Last name:</label>
<input type="text" id="lname" name="lname"><br><br>
<input type="image" src="img_submit.gif" alt="Submit" width="48" height="48">
</form>
The list Attribute
The input
list attribute refers to a <datalist> element that contains pre-defined options for an <input> element.Example
An <input> element with pre-defined values in a <datalist>:
<form>
<input list="browsers">
<datalist id="browsers">
<option value="Internet Explorer">
<option value="Firefox">
<option value="Chrome">
<option value="Opera">
<option value="Safari">
</datalist>
</form>
The autocomplete Attribute
The input
autocomplete attribute specifies whether a form or an input field should have autocomplete on or off.
Autocomplete allows the browser to predict the value. When a user starts to type in a field, the browser should display options to fill in the field, based on earlier typed values.
The
autocomplete attribute works with <form> and the following <input> types: text, search, url, tel, email, password, datepickers, range, and color.Example
An HTML form with autocomplete on, and off for one input field:
<form action="/action_page.php" autocomplete="on">
<label for="fname">First name:</label>
<input type="text" id="fname" name="fname"><br><br>
<label for="lname">Last name:</label>
<input type="text" id="lname" name="lname"><br><br>
<label for="email">Email:</label>
<input type="email" id="email" name="email" autocomplete="off"><br><br>
<input type="submit" value="Submit">
</form>
Tip: In some browsers you may need to activate an autocomplete function for this to work (Look under "Preferences" in the browser's menu).
HTML Exercises
HTML Form and Input Elements
| Tag | Description |
|---|---|
| <form> | Defines an HTML form for user input |
| <input> | Defines an input control |
For a complete list of all available HTML tags, visit our HTML Tag Reference.
HTML Input form* Attributes
The form Attribute
The input
form attribute specifies the form the <input> element belongs to.
The value of this attribute must be equal to the id attribute of the <form> element it belongs to.
Example
An input field located outside of the HTML form (but still a part of the form):
<form action="/action_page.php" id="form1">
<label for="fname">First name:</label>
<input type="text" id="fname" name="fname"><br><br>
<input type="submit" value="Submit">
</form>
<label for="lname">Last name:</label>
<input type="text" id="lname" name="lname" form="form1">
The formaction Attribute
The input
formaction attribute specifies the URL of the file that will process the input when the form is submitted.
Note: This attribute overrides the
action attribute of the <form> element.
The
formaction attribute works with the following input types: submit and image.Example
An HTML form with two submit buttons, with different actions:
<form action="/action_page.php">
<label for="fname">First name:</label>
<input type="text" id="fname" name="fname"><br><br>
<label for="lname">Last name:</label>
<input type="text" id="lname" name="lname"><br><br>
<input type="submit" value="Submit">
<input type="submit" formaction="/action_page2.php" value="Submit as Admin">
</form>
The formenctype Attribute
The input
formenctype attribute specifies how the form-data should be encoded when submitted (only for forms with method="post").
Note: This attribute overrides the enctype attribute of the
<form> element.
The
formenctype attribute works with the following input types: submit and image.Example
A form with two submit buttons. The first sends the form-data with default encoding, the second sends the form-data encoded as "multipart/form-data":
<form action="/action_page_binary.asp" method="post">
<label for="fname">First name:</label>
<input type="text" id="fname" name="fname"><br><br>
<input type="submit" value="Submit">
<input type="submit" formenctype="multipart/form-data"
value="Submit as Multipart/form-data">
</form>
The formmethod Attribute
The input
formmethod attribute defines the HTTP method for sending form-data to the action URL.
Note: This attribute overrides the method attribute of the
<form> element.
The
formmethod attribute works with the following input types: submit and image.
The form-data can be sent as URL variables (method="get") or as an HTTP post transaction (method="post").
Notes on the "get" method:
- This method appends the form-data to the URL in name/value pairs
- This method is useful for form submissions where a user want to bookmark the result
- There is a limit to how much data you can place in a URL (varies between browsers), therefore, you cannot be sure that all of the form-data will be correctly transferred
- Never use the "get" method to pass sensitive information! (password or other sensitive information will be visible in the browser's address bar)
Notes on the "post" method:
- This method sends the form-data as an HTTP post transaction
- Form submissions with the "post" method cannot be bookmarked
- The "post" method is more robust and secure than "get", and "post" does not have size limitations
Example
A form with two submit buttons. The first sends the form-data with method="get". The second sends the form-data with method="post":
<form action="/action_page.php" method="get">
<label for="fname">First name:</label>
<input type="text" id="fname" name="fname"><br><br>
<label for="lname">Last name:</label>
<input type="text" id="lname" name="lname"><br><br>
<input type="submit" value="Submit using GET">
<input type="submit" formmethod="post" value="Submit using POST">
</form>
The formtarget Attribute
The input
formtarget a attribute specifies a name or a keyword that indicates where to display the response that is received after submitting the form.
Note: This attribute overrides the target attribute of the
<form> element.
The
formtarget attribute works with the following input types: submit and image.Example
A form with two submit buttons, with different target windows:
<form action="/action_page.php">
<label for="fname">First name:</label>
<input type="text" id="fname" name="fname"><br><br>
<label for="lname">Last name:</label>
<input type="text" id="lname" name="lname"><br><br>
<input type="submit" value="Submit">
<input type="submit" formtarget="_blank" value="Submit to a new window/tab">
</form>
The formnovalidate Attribute
The input
formnovalidate attribute specifies that an <input> element should not be validated when submitted.
Note: This attribute overrides the novalidate attribute of the
<form> element.
The
formnovalidate attribute works with the following input types: submit.Example
A form with two submit buttons (with and without validation):
<form action="/action_page.php">
<label for="email">Enter your email:</label>
<input type="email" id="email" name="email"><br><br>
<input type="submit" value="Submit">
<input type="submit" formnovalidate="formnovalidate"
value="Submit without validation">
</form>
The novalidate Attribute
The
novalidate attribute is a <form> attribute.
When present, novalidate specifies that all of the form-data should not be validated when submitted.
Example
Specify that no form-data should be validated on submit:
<form action="/action_page.php" novalidate>
<label for="email">Enter your email:</label>
<input type="email" id="email" name="email"><br><br>
<input type="submit" value="Submit">
</form>
HTML Form and Input Elements
| Tag | Description |
|---|---|
| <form> | Defines an HTML form for user input |
| <input> | Defines an input control |
For a complete list of all available HTML tags, visit our HTML Tag Reference.


0 Comments