HTML Introduction
What is HTML?
HTML is the standard markup language for creating Web pages.
- HTML stands for Hyper Text Markup Language
- HTML describes the structure of a Web page
- HTML consists of a series of elements
- HTML elements tell the browser how to display the content
- HTML elements are represented by tags
- HTML tags label pieces of content such as "heading", "paragraph", "table", and so on
- Browsers do not display the HTML tags, but use them to render the content of the page
A Simple HTML Document
<!DOCTYPE html>
<html>
<head>
<title>Page Title</title>
</head>
<body>
<h1>My First Heading</h1>
<p>My first paragraph.</p>
</body>
</html>
<html>
<head>
<title>Page Title</title>
</head>
<body>
<h1>My First Heading</h1>
<p>My first paragraph.</p>
</body>
</html>
Example Explained
- The
<!DOCTYPE html>declaration defines this document to be HTML5 - The
<html>element is the root element of an HTML page - The
<head>element contains meta information about the document - The
<title>element specifies a title for the document - The
<body>element contains the visible page content - The
<h1>element defines a large heading - The
<p>element defines a paragraph
HTML Tags
HTML tags are element names surrounded by angle brackets:
<tagname>content goes here...</tagname>
- HTML tags normally come in pairs like
<p>and</p> - The first tag in a pair is the start tag, the second tag is the end tag
- The end tag is written like the start tag, but with a forward slash inserted before the tag name
Tip: The start tag is also called the opening tag, and the end tag the closing tag.
Web Browsers
The purpose of a web browser (Chrome, Edge, Firefox, Safari) is to read HTML documents and display them.
The browser does not display the HTML tags, but uses them to determine how to display the document:

HTML Page Structure
Below is a visualization of an HTML page structure:
<html>
Note: Only the content inside the <body> section (the white area above) is displayed in a browser.
<head>
<title>Page title</title>
</head>
<body>
</body>
</html>
<h1>This is a heading</h1>
<p>This is a paragraph.</p>
<p>This is another paragraph.</p>
Note: Only the content inside the <body> section (the white area above) is displayed in a browser.
The <!DOCTYPE> Declaration
The
<!DOCTYPE> declaration represents the document type, and helps browsers to display web pages correctly.
It must only appear once, at the top of the page (before any HTML tags).
The
<!DOCTYPE> declaration is not case sensitive.
The
<!DOCTYPE> declaration for HTML5 is:
<!DOCTYPE html>
HTML History
Since the early days of the World Wide Web, there have been many versions of HTML:
| Year | Version |
|---|---|
| 1989 | Tim Berners-Lee invented www |
| 1991 | Tim Berners-Lee invented HTML |
| 1993 | Dave Raggett drafted HTML+ |
| 1995 | HTML Working Group defined HTML 2.0 |
| 1997 | W3C Recommendation: HTML 3.2 |
| 1999 | W3C Recommendation: HTML 4.01 |
| 2000 | W3C Recommendation: XHTML 1.0 |
| 2008 | WHATWG HTML5 First Public Draft |
| 2012 | WHATWG HTML5 Living Standard |
| 2014 | W3C Recommendation: HTML5 |
| 2016 | W3C Candidate Recommendation: HTML 5.1 |
| 2017 | W3C Recommendation: HTML5.1 2nd Edition |
| 2017 | W3C Recommendation: HTML5.2 |
HTML Editors
Write HTML Using Notepad or TextEdit
Web pages can be created and modified by using professional HTML editors.
However, for learning HTML we recommend a simple text editor like Notepad (PC) or TextEdit (Mac).
We believe using a simple text editor is a good way to learn HTML.
Follow the steps below to create your first web page with Notepad or TextEdit.
Step 1: Open Notepad (PC)
Windows 8 or later:
Open the Start Screen (the window symbol at the bottom left on your screen). Type Notepad.
Windows 7 or earlier:
Open Start > Programs > Accessories > Notepad
Step 1: Open TextEdit (Mac)
Open Finder > Applications > TextEdit
Also change some preferences to get the application to save files correctly. In Preferences > Format > choose "Plain Text"
Then under "Open and Save", check the box that says "Display HTML files as HTML code instead of formatted text".
Then open a new document to place the code.
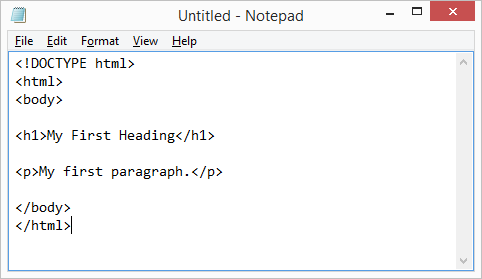
Step 2: Write Some HTML
Write or copy some HTML into Notepad.
<!DOCTYPE html>
<html>
<body>
<h1>My First Heading</h1>
<p>My first paragraph.</p>
</body>
</html>
Step 3: Save the HTML Page
Save the file on your computer. Select File > Save as in the Notepad menu.
Name the file "index.htm" and set the encoding to UTF-8 (which is the preferred encoding for HTML files).
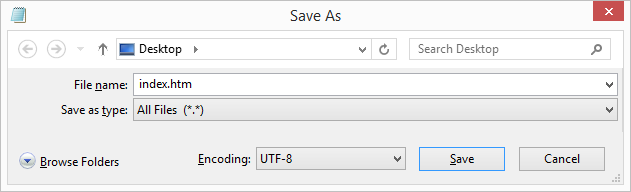
You can use either .htm or .html as file extension. There is no difference, it is up to you.
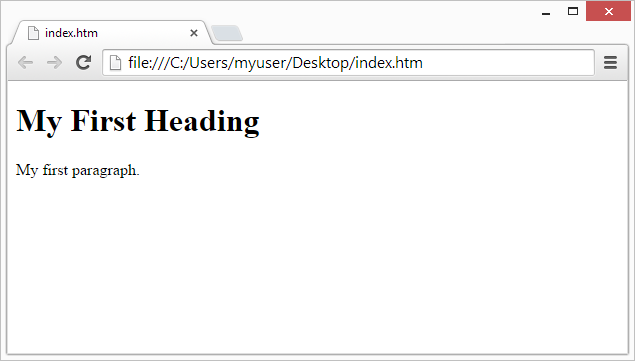
Step 4: View the HTML Page in Your Browser
Open the saved HTML file in your favorite browser (double click on the file, or right-click - and choose "Open with").
The result will look much like this:
W3Schools Online Editor
With our free online editor, you can edit the HTML code and view the result in your browser.
It is the perfect tool when you want to test code fast. It also has color coding and the ability to save and share code with others:
Example
<!DOCTYPE html>
<html>
<head>
<title>Page Title</title>
</head>
<body>
<h1>This is a Heading</h1>
<p>This is a paragraph.</p>
</body>
</html>
HTML Basic Examples
Don't worry if these examples use tags you have not learned.
You will learn about them in the next chapters.
HTML Documents
All HTML documents must start with a document type declaration:
<!DOCTYPE html>.
The HTML document itself begins with
<html> and ends with </html>.
The visible part of the HTML document is between
<body> and </body>.Example
<!DOCTYPE html>
<html>
<body>
<h1>My First Heading</h1>
<p>My first paragraph.</p>
</body>
</html>
HTML Headings
HTML headings are defined with the
<h1> to <h6> tags.<h1> defines the most important heading. <h6> defines the least important heading: Example
<h1>This is heading 1</h1>
<h2>This is heading 2</h2>
<h3>This is heading 3</h3>
HTML Paragraphs
HTML paragraphs are defined with the
<p> tag:Example
<p>This is a paragraph.</p>
<p>This is another paragraph.</p>
HTML Links
HTML links are defined with the
<a> tag:Example
<a href="https://www.w3schools.com">This is a link</a>
The link's destination is specified in the
href attribute.
Attributes are used to provide additional information about HTML elements.
You will learn more about attributes in a later chapter.
HTML Images
HTML images are defined with the
<img> tag.
The source file (
src), alternative text (alt), width, and height are provided as attributes:Example
<img src="w3schools.jpg" alt="W3Schools.com" width="104" height="142">
HTML Buttons
HTML buttons are defined with the
<button> tag:Example
<button>Click me</button>
HTML Lists
HTML lists are defined with the
<ul> (unordered/bullet list) or the <ol> (ordered/numbered list) tag, followed by <li> tags (list items):Example
<ul>
<li>Coffee</li>
<li>Tea</li>
<li>Milk</li>
</ul>
<ol>
<li>Coffee</li>
<li>Tea</li>
<li>Milk</li>
</ol>
HTML Elements
HTML Elements
An HTML element usually consists of a start tag and an end tag, with the content inserted in between:
<tagname>Content goes here...</tagname>
The HTML element is everything from the start tag to the end tag:
<p>My first paragraph.</p>
| Start tag | Element content | End tag |
|---|---|---|
| <h1> | My First Heading | </h1> |
| <p> | My first paragraph. | </p> |
| <br> |
HTML elements with no content are called empty elements. Empty elements do not have an end tag, such as the <br> element (which indicates a line break).
Nested HTML Elements
HTML elements can be nested (elements can contain elements).
All HTML documents consist of nested HTML elements.
This example contains four HTML elements:
Example
<!DOCTYPE html>
<html>
<body>
<h1>My First Heading</h1>
<p>My first paragraph.</p>
</body>
</html>
Example Explained
The
<html> element defines the whole document.
It has a start tag <html> and an end tag </html>.
Inside the <html> element is the
<body> element.
<html>
<body>
<h1>My First Heading</h1>
<p>My first paragraph.</p>
</body>
</html>
The
<body> element defines the document body.
It has a start tag <body> and an end tag </body>.
Inside the <body> element is two other HTML elements:
<h1> and <p>.
<body>
<h1>My First Heading</h1>
<p>My first paragraph.</p>
</body>
The
<h1> element defines a heading.
It has a start tag <h1> and an end tag </h1>.
The element content is: My First Heading.
<h1>My First Heading</h1>
The
<p> element defines a paragraph.
It has a start tag <p> and an end tag </p>.
The element content is: My first paragraph.
<p>My first paragraph.</p>
Do Not Forget the End Tag
Some HTML elements will display correctly, even if you forget the end tag:
Example
<html>
<body>
<p>This is a paragraph
<p>This is a paragraph
</body>
</html>
The example above works in all browsers, because the closing tag is considered optional.
Never rely on this. It might produce unexpected results and/or errors if you forget the end tag.
Empty HTML Elements
HTML elements with no content are called empty elements.
<br> is an empty element without a closing tag (the <br> tag defines a line break):Example
<p>This is a <br> paragraph with a line break.</p>
Empty elements can be "closed" in the opening tag like this: <br />.
HTML5 does not require empty elements to be closed. But if you want stricter validation, or if you need to make your document readable by XML parsers, you must close all HTML elements properly.
HTML Is Not Case Sensitive
HTML tags are not case sensitive: <P> means the same as <p>.
The HTML5 standard does not require lowercase tags, but W3C recommends lowercase in HTML, and demands lowercase for stricter document types like XHTML.
At W3Schools we always use lowercase tags.
HTML Attributes
Attributes provide additional information about HTML elements.
HTML Attributes
- All HTML elements can have attributes
- Attributes provide additional information about an element
- Attributes are always specified in the start tag
- Attributes usually come in name/value pairs like: name="value"
The href Attribute
HTML links are defined with the
<a> tag. The link address is specified in the href attribute:Example
<a href="https://www.w3schools.com">This is a link</a>
You will learn more about links and the
<a> tag later in this tutorial.The src Attribute
HTML images are defined with the
<img> tag.
The filename of the image source is specified in the
src attribute:Example
<img src="img_girl.jpg">
The width and height Attributes
HTML images also have
width and height attributes, which specifies the width and height of the image:Example
<img src="img_girl.jpg" width="500" height="600">
The width and height are specified in pixels by default; so width="500" means 500 pixels wide.
You will learn more about images in our HTML Images chapter.
The alt Attribute
The
alt attribute specifies an alternative text to be used, if an image cannot be displayed.
The value of the
alt attribute can be read by screen readers. This way, someone "listening" to the webpage, e.g. a vision impaired person, can "hear" the element.Example
<img src="img_girl.jpg" alt="Girl with a jacket">
The
alt attribute is also useful if the image cannot be displayed (e.g. if it does not exist):Example
See what happens if we try to display an image that does not exist:
<img src="img_typo.jpg" alt="Girl with a jacket">
The style Attribute
The
style attribute is used to specify the styling of an element, like color, font, size etc.Example
<p style="color:red">This is a red paragraph.</p>
You will learn more about styling later in this tutorial, and in our CSS Tutorial.
The lang Attribute
The language of the document can be declared in the
<html> tag.
The language is declared with the
lang attribute.
Declaring a language is important for accessibility applications (screen readers) and search engines:
<!DOCTYPE html>
<html lang="en-US">
<body>
...
</body>
</html>
The first two letters specify the language (en). If there is a dialect, add two more letters (US).
The title Attribute
Here, a
title attribute is added to the <p> element. The value of the title attribute will be displayed as a tooltip when you mouse over the paragraph:Example
<p title="I'm a tooltip">
This is a paragraph.
</p>
We Suggest: Use Lowercase Attributes
The HTML5 standard does not require lowercase attribute names.
The title attribute can be written with uppercase or lowercase like title or TITLE.
W3C recommends lowercase in HTML, and demands lowercase for stricter document types like XHTML.
At W3Schools we always use lowercase attribute names.
We Suggest: Quote Attribute Values
The HTML5 standard does not require quotes around attribute values.
The
href attribute can be written without quotes:Bad
<a href=https://www.w3schools.com>
Good
<a href="https://www.w3schools.com">
W3C recommends quotes in HTML, and demands quotes for stricter document types like XHTML.
Sometimes it is necessary to use quotes. This example will not display the title attribute correctly, because it contains a space:
Example
<p title=About W3Schools>
Using quotes are the most common. Omitting quotes can produce errors.
At W3Schools we always use quotes around attribute values.
At W3Schools we always use quotes around attribute values.
Single or Double Quotes?
Double quotes around attribute values are the most common in HTML, but single quotes can also be used.
In some situations, when the attribute value itself contains double quotes, it is necessary to use single quotes:
<p title='John "ShotGun" Nelson'>
Or vice versa:
<p title="John 'ShotGun' Nelson">
Chapter Summary
- All HTML elements can have attributes
- The
titleattribute provides additional "tool-tip" information - The
hrefattribute provides address information for links - The
widthandheightattributes provide size information for images - The
altattribute provides text for screen readers - At W3Schools we always use lowercase attribute names
- At W3Schools we always quote attribute values
HTML Exercises
HTML Attributes
Below is an alphabetical list of some attributes often used in HTML, which you will learn more about in this tutorial:
| Attribute | Description |
|---|---|
| alt | Specifies an alternative text for an image, when the image cannot be displayed |
| disabled | Specifies that an input element should be disabled |
| href | Specifies the URL (web address) for a link |
| id | Specifies a unique id for an element |
| src | Specifies the URL (web address) for an image |
| style | Specifies an inline CSS style for an element |
| title | Specifies extra information about an element (displayed as a tool tip) |
A complete list of all attributes for each HTML element, is listed in our: HTML Attribute Reference.
HTML Headings
Headings
Heading 1
Heading 2
Heading 3
Heading 4
Heading 5
Heading 6
HTML Headings
Headings are defined with the
<h1> to <h6> tags.<h1> defines the most important heading. <h6> defines the least important heading.Example
<h1>Heading 1</h1>
<h2>Heading 2</h2>
<h3>Heading 3</h3>
<h4>Heading 4</h4>
<h5>Heading 5</h5>
<h6>Heading 6</h6>
Note: Browsers automatically add some white space (a margin) before and after a heading.
Headings Are Important
Search engines use the headings to index the structure and content of your web pages.
Users often skim a page by its headings. It is important to use headings to show the document structure.
<h1> headings should be used for main headings, followed by <h2> headings, then the less important <h3>, and so on.
Note: Use HTML headings for headings only. Don't use headings to make text BIG or bold.
Bigger Headings
Each HTML heading has a default size. However, you can specify the size for any heading with the
style attribute, using the CSS font-size property:Example
<h1 style="font-size:60px;">Heading 1</h1>
HTML Horizontal Rules
The
<hr> tag defines a thematic break in an HTML page, and is most often displayed as a horizontal rule.
The
<hr> element is used to separate content (or define a change) in an HTML page:Example
<h1>This is heading 1</h1>
<p>This is some text.</p>
<hr>
<h2>This is heading 2</h2>
<p>This is some other text.</p>
<hr>
The HTML <head> Element
The HTML
<head> element is a container for metadata. HTML metadata is data about the HTML document. Metadata is not displayed.
The
<head> element is placed between the <html> tag and the <body> tag:Example
<!DOCTYPE html>
<html>
<head>
<title>My First HTML</title>
<meta charset="UTF-8">
</head>
<body>
.
.
.
Note: Metadata typically define the document title, character set, styles, scripts, and other meta information.
How to View HTML Source?
Have you ever seen a Web page and wondered "Hey! How did they do that?"
View HTML Source Code:
Right-click in an HTML page and select "View Page Source" (in Chrome) or "View Source" (in Edge), or similar in other browsers. This will open a window containing the HTML source code of the page.
Inspect an HTML Element:
Right-click on an element (or a blank area), and choose "Inspect" or "Inspect Element" to see what elements are made up of (you will see both the HTML and the CSS). You can also edit the HTML or CSS on-the-fly in the Elements or Styles panel that opens.
HTML Exercises
HTML Tag Reference
W3Schools' tag reference contains additional information about these tags and their attributes.
You will learn more about HTML tags and attributes in the next chapters of this tutorial.
| Tag | Description |
|---|---|
| <html> | Defines the root of an HTML document |
| <body> | Defines the document's body |
| <head> | A container for all the head elements (title, scripts, styles, meta information, and more) |
| <h1> to <h6> | Defines HTML headings |
| <hr> | Defines a thematic change in the content |
For a complete list of all available HTML tags, visit our HTML Tag Reference.
HTML Paragraphs
HTML Paragraphs
The HTML
<p> element defines a paragraph:Example
<p>This is a paragraph.</p>
<p>This is another paragraph.</p>
Note: Browsers automatically add some white space (a margin) before and after a paragraph.
HTML Display
You cannot be sure how HTML will be displayed.
Large or small screens, and resized windows will create different results.
With HTML, you cannot change the output by adding extra spaces or extra lines in your HTML code.
The browser will remove any extra spaces and extra lines when the page is displayed:
Example
<p>
This paragraph
contains a lot of lines
in the source code,
but the browser
ignores it.
</p>
<p>
This paragraph
contains a lot of spaces
in the source code,
but the browser
ignores it.
</p>
Don't Forget the End Tag
Most browsers will display HTML correctly even if you forget the end tag:
Example
<p>This is a paragraph.
<p>This is another paragraph.
The example above will work in most browsers, but do not rely on it.
Note: Dropping the end tag can produce unexpected results or errors.
HTML Line Breaks
The HTML
<br> element defines a line break.
Use
<br> if you want a line break (a new line) without starting a new paragraph:Example
<p>This is<br>a paragraph<br>with line breaks.</p>
The
<br> tag is an empty tag, which means that it has no end tag.The Poem Problem
This poem will display on a single line:
Example
<p>
My Bonnie lies over the ocean.
My Bonnie lies over the sea.
My Bonnie lies over the ocean.
Oh, bring back my Bonnie to me.
</p>
The HTML <pre> Element
The HTML
<pre> element defines preformatted text.
The text inside a
<pre> element is displayed in a fixed-width font (usually Courier), and it preserves both spaces and line breaks:Example
<pre>
My Bonnie lies over the ocean.
My Bonnie lies over the sea.
My Bonnie lies over the ocean.
Oh, bring back my Bonnie to me.
</pre>
HTML Exercises
HTML Tag Reference
W3Schools' tag reference contains additional information about HTML elements and their attributes.
| Tag | Description |
|---|---|
| <p> | Defines a paragraph |
| <br> | Inserts a single line break |
| <pre> | Defines pre-formatted text |
For a complete list of all available HTML tags, visit our HTML Tag Reference.
HTML Styles
Example
I am Red
I am Blue
I am Big
The HTML Style Attribute
Setting the style of an HTML element, can be done with the
style attribute.
The HTML
style attribute has the following syntax:
<tagname style="property:value;">
The property is a CSS property. The value is a CSS value.
You will learn more about CSS later in this tutorial.
Background Color
The CSS
background-color property defines the background color for an HTML element.
This example sets the background color for a page to powderblue:
Example
<body style="background-color:powderblue;">
<h1>This is a heading</h1>
<p>This is a paragraph.</p>
</body>
Text Color
The CSS
color property defines the text color for an HTML element:Example
<h1 style="color:blue;">This is a heading</h1>
<p style="color:red;">This is a paragraph.</p>
Fonts
The CSS
font-family property defines the font to be used for an HTML element:Example
<h1 style="font-family:verdana;">This is a heading</h1>
<p style="font-family:courier;">This is a paragraph.</p>
Text Size
The CSS
font-size property defines the text size for an HTML element:Example
<h1 style="font-size:300%;">This is a heading</h1>
<p style="font-size:160%;">This is a paragraph.</p>
Text Alignment
The CSS
text-align property defines the horizontal text alignment for an HTML element:Example
<h1 style="text-align:center;">Centered Heading</h1>
<p style="text-align:center;">Centered paragraph.</p>
Chapter Summary
- Use the
styleattribute for styling HTML elements - Use
background-colorfor background color - Use
colorfor text colors - Use
font-familyfor text fonts - Use
font-sizefor text sizes - Use
text-alignfor text alignment
HTML Exercises
HTML Text Formatting
Text Formatting
This text is bold
This text is italic
This is subscript and superscript
HTML Formatting Elements
In the previous chapter, you learned about the HTML style attribute.
HTML also defines special elements for defining text with a special meaning.
HTML uses elements like
<b> and <i> for formatting output, like bold or italic text.
Formatting elements were designed to display special types of text:
<b>- Bold text<strong>- Important text<i>- Italic text<em>- Emphasized text<mark>- Marked text<small>- Small text<del>- Deleted text<ins>- Inserted text<sub>- Subscript text<sup>- Superscript text
HTML <b> and <strong> Elements
The HTML
<b> element defines bold text, without any extra importance.Example
<b>This text is bold</b>
The HTML
<strong> element defines strong text, with added semantic "strong" importance.Example
<strong>This text is strong</strong>
HTML <i> and <em> Elements
The HTML
<i> element defines italic text, without any extra importance.Example
<i>This text is italic</i>
The HTML
<em> element defines emphasized text, with added semantic importance.Example
<em>This text is emphasized</em>
Note: Browsers display
<strong> as <b>, and <em> as <i>. However, there is a difference in the meaning of these tags: <b> and <i> defines bold and italic text, but <strong> and <em> means that the text is "important".HTML <small> Element
The HTML
<small> element defines smaller text:Example
<h2>HTML <small>Small</small> Formatting</h2>
HTML <mark> Element
The HTML
<mark> element defines marked/highlighted text:Example
<h2>HTML <mark>Marked</mark> Formatting</h2>
HTML <del> Element
The HTML
<del> element defines deleted/removed text.Example
<p>My favorite color is <del>blue</del> red.</p>
HTML <ins> Element
The HTML
<ins> element defines inserted/added text.Example
<p>My favorite <ins>color</ins> is red.</p>
HTML <sub> Element
The HTML
<sub> element defines subscripted text.Example
<p>This is <sub>subscripted</sub> text.</p>
HTML <sup> Element
The HTML
<sup> element defines superscripted text.Example
<p>This is <sup>superscripted</sup> text.</p>
HTML Exercises
HTML Text Formatting Elements
| Tag | Description |
|---|---|
| <b> | Defines bold text |
| <em> | Defines emphasized text |
| <i> | Defines italic text |
| <small> | Defines smaller text |
| <strong> | Defines important text |
| <sub> | Defines subscripted text |
| <sup> | Defines superscripted text |
| <ins> | Defines inserted text |
| <del> | Defines deleted text |
| <mark> | Defines marked/highlighted text |
For a complete list of all available HTML tags, visit our HTML Tag Reference.


0 Comments